Ugly Button Adventure 2 Gameplay Guide
Ugly Button’s Saga continues with Latest Ugly Button Adventure 2 or Ugly Button 2 from Magikelle Studio.
The next chapter in the Ugly Button Adventures’ series bring us into Abandoned Mansion. And again, it is a point-and-click and beautifully hand-drawn adventure of Ugly Button.
Have not play the first adventure yet? No worries because we save it for you right here – Ugly Button Adventure Walkthrough Guide [100%].
Ugly Button Adventure 2 Game Information
- The Release Date: December 7 2023
- Developer: Magikelle Studio
- Download link for Android: Ugly Button Adventure 2
The game is absolutely FREE with an option of in-Game Purchases, for instance to play without ads.
Ugly Button Adventure 2 Walkthrough Guide
You are at the landing place.
- Click on the picture with the chicken leg on the plate to get a new information, an item’s clue (V – bird’s wing).
- Go left and collect water can from the window.
- Go twice to right. Click on the left picture with an iron. Use water can to switch it with the iron.
- Go twice to the left. Click on the picture on the right. Switch the iron with a shoe.
- Go twice to the right. Click on the picture with a man. Switch the show with a net.
- Go twice to the left. Click on the picture with a boy. Switch the net with a fish.
- Go to the right. Click on the picture with the key on the plate and switch the fish with the key to the guest room.
- Click on the door and use the key to unlock it.
Guest Room
- Go to the left. Click on the black cat. Collect a light’s chain. Click on the clock to move it, and collect a piece of paper (1/5) behind it. Click on the fireplace’s grill and collect a piece of coal.
- Go to the left. Click on the big door of the cabinet under the gramophone. Collect a vinyl. Click on the second drawer and collect a handle. Click on the gramophone, install the vinyl and the handle on the right. Collect a piece of paper (2/5).
- Go to the left. Click on the bottom left corner of the picture and collect a piece of paper (3/5). Click on the books and collect a piece of paper (4/5) from the magazine. Click on the round mechanism and solve the puzzle by bringing down the piece in the centre. Collect the piece (shaped key).
- Go to the left. Click on the lamp above the table and install the light chain. Click on the chain and collect a piece of paper (5/5).
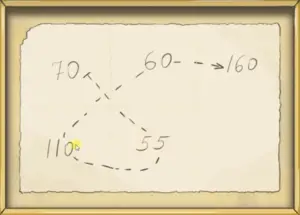
- Click on the piece of paper on the table. Put on the board all 5 collected piece of papers and solve the puzzle by combing its in the right order (see below). It is a clue for the radio’s channels: 70-55-110-60-160.

- Go twice to the left. Click on the power receptacle and plug the power cord in. Click on the cabinet’s door and install the shaped key. Open the cabinet and click on the left switch, to turn the radio on. Now click on the radio and tune it to the five channels, as above, 70-55-110-60-160. Collect a lighthouse figure.
- Go to the left and install the lighthouse into the picture. Collect a coin (1/5).
- Exit the guest room.
You are at the landing place. Go to the left and enter the door on the left, beside the picture with a woman.
Closet Room
- Click on the shoes shelves and solve the puzzle by arranging shoes in pairs. The order is not matter. Collect a sewing machine’s handle from the shoe.
- Click on the sewing machine and install the handle. Click on the handle to open the little opening and collect a key to the children room.
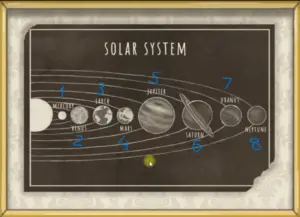
- Go to the right. Click on the bag and collect a piece of paper with a clue for the safe’s code. Remember this order of the planets. Click on the picture of the solar system. Find the number in the order for each planet, for instance: first for Jupiter, it is fifth in the row, etc (see the solution below)… The code is Jupiter (5), Saturn (6), Neptune (8), Uranus (7), Earth (3), Venus (2), Mars (4) and Mercury (1) – 56873241.

- Collect a ladder.
- Go to the left. Click on the safe and enter the code 56873241. Collect a knife.
- Use the ladder to reach the pillows. Use the knife to cut it and collect a coin (2/5).
- Exit the room.
You are on the landing area. Go twice to the left. Enter the door on the right, beside the picture with a woman.
Bathroom room
- Click on the towel and collect a hairpin.
- Click on the spider web at the right bottom of the bathtub. Solve the puzzle by collecting all small spiders by one line only (the solution can be watched at 10:18 time of the video). Collect a key.
- Exit the room
You are at the landing place. Enter the door on the left, beside the picture of a boy, by using small key.
Children’s room
- Click on the cabinet under the elephant, open it and get new information “II Skull“.
- Click on the elephant and the piece of paper under it. There is weird note with the author initials L.C.. It is a clue for the book with a matches.
- Click on the right cabinet, open ti and collect a ball.
- Go to the right. Click on the desk’s drawer and find a picture of frog, the same as on a coin.
- Click on the piggy bank and use the ball to break it. Collect a coin (3/5).
- Go twice to the right. Click on the second drawer of the cabinet. Click on the box and solve the puzzle by arranging all arrows pointing to the heart. Collect piece of paper “Top secret”.
- Collect a chair.
- Click on the dresser and collect an umbrella.
- Go twice to the left. Click on the planks under the window. Use the umbrella to take out the box with a key inside. Collect the key.
- Go twice to the right. Use the chair to reach the box on the dresser’s shelf. Use the key to unlock it. Read Amelia’s diary to know about invisible ink and a candle to read it.
- Click on the bookshelf and find the book with author’s initial LC (Lewis Carroll). Open it and collect a matches.
- Go twice to the left. open the window’s curtain. Click on the candle, use the matches to lit it up. Read the Top secret paper above the candle to get the drawing.
- Exit the room.
You are on the landing area. Go to the room on the right (the bathroom).
Bathroom room
- Use the hairpin to unlock the glass cabinet. Solve the puzzle to create a rainbow’s colours. The solution is: Red – Orange (red + yellow) – Yellow – Green (yellow + blue) – Light blue ( white + blue) – Blue – Purple (blue + red). Collect a knob.
- Click on the cabinet and install the knob. Collect a valve.
- Click on the bathtub’s faucet and install the valve. Turn it on.
- Click on the mirror and play the mini game to get 3 wins. Collect a coin (4/5).
- Exit the room.
You are in the landing area. Go twice to the right and use the key to enter the room on the right (parents room).
Parents room
- Go to the right and click on the board with the cards. The board has a symbol of the card that belongs to this board. This room has four boards. You need to solve each board with right cards with the playing cards order from smallest to biggest (increasing order). You received a queen card with the queen looking into the mirror.
- Click on the mirror and collect a coin (5/5) from the small metal box.
- Click on the big dresser, open the box under hanging clothes and read the letters.
- Exit the room.
You are on the landing area. Go to the right and down.
Hall room
- Go twice on the right, then straight on the left of the stairwell. Go to the left. Click on the picture with a horse for an item’s clue (I – horse).
- Go to the right and then straight. Click on the Sherlock’s head (III – pipe).
- Go twice to the right and then straight on the left. Click on the chess board and collect a horse figure.
- Go to the left and click on the picture above the coach. There is a clue “Phone Maria” for the safe code.
- Go to the phone and look on the dial to find letters of the word MARIA. M (6), A (2), R (7) , I (4) and A (2) – 62742. Click on the stand’s drawer and find an item clue (IV – trident).
- Go back to the safe and enter 62742. Open the box and collect a pipe.
- Go twice to the left and collect a shoehorn from the table’s drawer.
- Go and find a board with the butterflies on the stairwell’s wall. Use the shoehorn to break the glass and collect a butterfly with a skull.
- Go to the cabinet with an owl inside. Use all five coins and collect a white and long bird’s feather.
- Go to the kitchen (the door beside the owl cabinet). Click on the door under the sink and collect a bin. Click on the next cabinet’s door to collect a scissors. Go to the right and put the bin under the handing items. Use the scissors to cut it down to get a hook. Go back to the kitchen sink, drain the water and use the hook to get a key from the drain. Go to the right and use the key to unlock the cabinet’s drawer. Collect a trident. Exit the room.
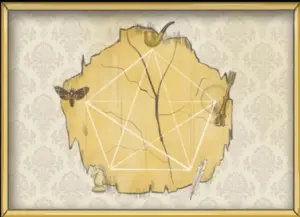
- Go to the area with a pentagram drawing on the wall. Install all item in the proper order (see below). Use a piece of coal to draw through the lines at ones. The use the top secret picture on it and collect the shard of truth.
- Click on the shard of truth and go to the front door. Collect a key.
- Turn off the shard of the truth and use the key to exit the Abandoned Mansion.

Ugly Button Adventure 2 – Coins locations
You need to collect five coins. The locations are the following:
- The guest room, the picture with lighthouse installed.
- The closet room, in the pillows.
- The children’s room, the piggy bank.
- The bathroom room, the cabinet under the mirror.
- The parents room, the mirror.
Ugly Button Adventure 2 – Items’ clue locations
- The hall room, the horse picture (I – horse).
- The children’s room, the cabinet under the elephant (II – skull).
- The hall room, Sherlock’s head (III – pipe).
- The hall room, the phone’s stand drawer (IV – trident).
- The picture on the landing area with the chicken leg on the plate (V – bird’s feather wing)
Ugly Button Adventure 2 – Items’ locations
- The hall room, the chess board (horse figure)
- The hall room, the butterfly with a skull (skull).
- The hall room, in the safe’s box (pipe).
- The kitchen room, in the cabinet’s drawer (trident fork).
- The hall room, the cabinet with an owl, need to have five coins to unlock it (white long bird’s feather).
End of Ugly Button Adventure 2!
Ugly Button Adventure 2 Walkthrough Video
Ugly Button To be continued…


![Tricky Doors 24 Enchanted Woods Walkthrough Guide [F2P] Tricky-doors-24-walkthrough](https://adoginthefog.com/wp-content/uploads/2026/05/trickydoors24thumb-218x150.png)
![Mind Shaper Walkthrough Guide [All Chapters – F2P] mind shaper walkthrough](https://adoginthefog.com/wp-content/uploads/2026/04/mind-shaper-walkthrough-218x150.png)
![Living Legends Voice Of The Sea Walkthrough [F2P] living_legends_voice_of_the_sea_walkthrough_f2p](https://adoginthefog.com/wp-content/uploads/2026/04/voiceoftheseathumb-218x150.png)

![Honest Vanished Anniversary Walkthrough [100%] vanishedanniversary](https://adoginthefog.com/wp-content/uploads/2022/09/vanishedanniversary-100x70.png)
![Scary Horror 2 Escape Games Walkthrough Guide [100%] scary horror 2 escape game walkthrough](https://adoginthefog.com/wp-content/uploads/2021/08/Screenshot-55-100x70.png)
![Happy Wordbrain 2 Holiday Event Answers [2025] Wordbrain 2 Holiday Event Answers](https://adoginthefog.com/wp-content/uploads/2018/12/Wordbrain-2-Holiday-Event-Answers-100x70.png)